Peony 'Sarah Bernhardt'

Peony 'Sarah Bernhardt'

Friday, February 29, 2008

Spicy Toasted Pecans

I got this recipe from epicurious.com and cooked up a batch for my Christmas Eve Party. They were so delicious I've been making them ever since and eat them as a great mid-day snack. I think I love them so much because they remind me of the flavors in the "chex-mix" my mom whipped for family holiday get-togethers during my childhood.

In Health,
Miss Jolie Ann


Spicy Toasted Pecans
Yields 2.5 cups
3 tbsp organic butter
1/2 tsp vegetarian Worcestershire sauce (try Annie's brand)
1/2 tsp Tabasco sauce
1/4 tsp organic black pepper
1/4 tsp organic sea salt
2.5 cups organic pecan halves (about 10 oz.)
Place oven rack in middle position and preheat oven to 375 degrees
Melt butter in a sauce-pan over moderate heat, then stir in the Worcestershire sauce, Tabasco, pepper and salt. Remove pan from the heat and add the pecans, tossing to coat well.
Spread pecan mixture in one layer on a baking sheet or shallow baking pan. Bake until fragrant and a shade darker, about 8-10 minutes.
Serve warm or at room temperature. Once cooled they can be stored in an airtight container in the refrigerator.

Inspiration for Winter Salad Making


Don't we all love salads during the summer and autumn when we are blessed with an abundance of fresh tomatoes, cucumbers, bell peppers, lettuces, corn?? Yes, summer seems to be the season of salads. However, I eat a salad nearly every day year round. And I am not talking about a salad in December with tomatoes and cucumbers. Since I began eating more in harmony with the seasons I only get to enjoy these hot weather produce treats when they are actually grown in the ground by my local farmers or from my own garden. The benefits of a raw vegetable salad are many-they are overflowing with fiber and vitamins and minerals in their natural form. So eating a somewhat seasonal salad throughout the winter can be challenging. First of all I try to grow a lot of my own salad greens, which I have success with from March-November. During the December, January and February months I rely on hardier greens from the grocery store like kale, cabbage, swiss chard, spinach, etc. These are the items I'm currently eating in my winter salad. I hope they inspire you to munch a raw salad every day!
In Health,
Miss Jolie Ann


Kale

Purple Cabbage

Kohlrabi

Broccoli

Cauliflower

Carrots

Grated Raw Parsnip

Grated Raw Beets

Radishes

Canned Beans: Garbanzo, Kidney & Black-Eyed Peas

Nuts: Cashews, Walnuts & Pecans

Seeds: Sunflower & Pumpkin

Cheese-grated or cubed: Cheddar, Parmesan, Swiss

Spanish-Spiced Yam & Garbanzo Bean Soup

This recipe is adapted from the Gypsy Soup recipe in the Moosewood Cookbook (1992 edition) by Mollie Katzen. I started cooking this recipe 2 years ago and it's a great simple soup with several variations. I love the eclectic combination of the spanish spices. When this soup is cooking your will kitchen smell amazing! I adapted the recipe so that my version is more in harmony with seasonal produce during the winter. I usually serve this soup with some toasted garlic ciabatta bread.
In Health,
Miss Jolie Ann

Spanish-Spiced Yam & Garbanzo Bean Soup
Yields 5 servings

2 tbsp organic extra virgin olive oil
1 large organic yellow onion-chopped
5 medium organic garlic cloves-chopped
2 stalks organic celery-minced
1 medium organic garnet or jewel yam-peeled and chopped
1 tsp organic sea salt
2 tsp organic paprika
1 tsp organic turmeric
1 tsp organic dried basil
a pinch of organic cinnamon
a pinch of organic cayenne
1 organic bay leaf
1-28 oz can of organic chopped tomatoes
1-14 oz can of organic garbanzo beans
3 cups water

1. Heat the olive oil in a large soup pot over medium heat. Add the onion and sauté for about 10 minutes until the onion is soft.
2. Add the garlic, celery, yam, salt and continue to sauté for another 5 minutes.
3. Add the paprika, turmeric, basil, cinnamon, cayenne and stir to combine the spices and veggies. Continue to sauté for another 5 minutes.
4. Add the bay leaf, tomatoes, garbanzo beans and water. Cover the pot and bring to a boil. Once boiling reduce heat to medium.
5. Simmer, stirring occasionally, for approximately 20 minutes. When the yams are very tender the soup is done.
6. Remove the bay leaf and serve. This soup stores well in the refrigerator for several meals.

The Best Breakfast Oatmeal

Steel cut oats are the best. You might be more familiar with rolled oats for your hot breakfast cereal. Steel cut oats are the unprocessed whole grain oat and are very nutritious and delicious. Once a week I cook a big pot of steel cut oats and reheat a small portion each morning for breakfast. It's a great start to your day. My version of steel cut oats is a real "breakfast of champions" packed with whole grain, fiber, and protein. Here's the basic recipe then all of my add-in's:

1 cup steel cut oats
1 tbsp cinnamon
1 tsp alcohol-free pure vanilla
4 cups water

Place the oats, cinnamon, and vanilla in a medium-large pot and add the water. Cover the pot and bring to a boil. Once boiling turn down the heat to the lowest simmer. Cook covered for 30 minutes. Stir occasionally and check to make sure oats aren't sticking. Add additional water as needed. This will yield enough oats for me to eat for about 6 mornings. I don't sweeten my cereal beyond the cinnamon and vanilla, because I really don't need the sugar. Consider rethinking sweetening your morning cereal.

Each morning I reheat a small portion of the oats (About 1/2 cup) with these add-ins:

1/2 cup organic unsweetened soymilk
1 organic banana-sliced
1 tbsp organic raisins
1 tbsp organic sliced almonds
1 tbsp organic chopped walnuts
1 tsp organic unsweetened raw shredded coconut

A note about cinnamon...I love cinnamon for it's delicious taste and also for it's magical/folklore uses. I need as much good energy and positive vibrations I can gather every morning to start my day! In "The Goddess in the Office" by Z. Budapest she says there are a number of magical herbs and spices associated with wealth. And you guessed it-cinnamon is one of them! She recommends baking cinnamon in cookies, rolls and bread. So, here's what I'm saying-I'm going to add cinnamon to my food every morning to symbolize my readiness for financial prosperity and growth. How about you give it a try too and let me know how it works!

In Health,
Miss Jolie Ann

Sunday, February 24, 2008

Thanks for your Support!

Friends,

Thank you so much for all your supportive emails regarding the launch of this new blog site. When I checked my email today it was wonderful to receive so many emails of encouragement. Keep checking back for new recipes and gardening tips. Please let me know how the recipes work out for you and if you have any questions. I look forward to continued feedback.

In Health,
Miss Jolie Ann

Friday, February 22, 2008

Winter Squash & Spinach Tostadas


Winter Squash & Spinach Tostadas
Recipe Created by Miss Jolie Ann February 2008

I threw this tostada recipe together to use up the acorn squash that was sitting in my produce bowl, the tortillas and bag of organic baby spinach sitting in my refrigerator. My inspiration to experiment with tostada toppings came from A Year in a Vegetarian Kitchen by Jack Bishop which I picked up in the Spring of 2007. I love using whole wheat tortillas to make crisp tostada shells. I highly recommend the hand-made whole wheat tortillas from Trader Joe's, they work well for this recipe. Tostada shells are a perfect foundation for an endless variety of seasonal toppings. I love avocados on just about everything and I grow cilantro year-round in my backyard kitchen-garden. They are both excellent toppings for tostadas. I hope you enjoy this recipe and are inspired to experiment with your cooking!

In Health,
Miss Jolie Ann


Winter Squash & Spinach Tostadas

Yield: 4 Tostadas


1 small-medium size organic acorn squash

2 tbsp organic extra virgin olive oil

2 medium cloves organic garlic-minced

6 oz bag organic baby spinach

4 organic whole wheat tortillas

Organic sharp cheddar cheese-grated/shredded

1 organic avocado-peeled, pitted & sliced

Organic cilantro-chopped


1. Preheat oven to 400 degrees F.


2. Slice acorn squash in half and scoop out the center seeds. Place the squash halves, sliced side down, on an ungreased cookie sheet. Bake at 400 degrees for 30 minutes until tender when poked with a fork. Once cooked, scoop squash from skin. Mash squash in a bowl with a fork and add salt and pepper to taste if wanted. It's also great just plain.


3. While squash is baking, heat olive oil in a large skillet on medium setting. Add garlic and spinach. Saute about 5 minutes until the spinach is wilted but remains bright green. Do not over cook! Remove from pan to stop cooking.


4. Place 2 tortillas on an ungreased cookie sheet. If you wish to make all 4 tortillas for the same meal add another 2 tortillas on a 2nd ungreased cookie sheet. To make one tostada spread a quarter of the squash on one tortilla, then top with a quarter of the spinach-garlic mixture, then top with as much cheese as you desire-I use about 1 tbsp per tostada.


5. Place the cookie sheets in the oven on the top rack and bake for 10-15 minutes. The tostadas are done when the cheese is melted and the tortillas are crispy with slightly browned edges.


6. Top the cooked tostadas with sliced avocado and cilantro.

Swiss Cheese & Onion Soup with Homemade Croutons Recipe


Swiss Cheese & Onion Soup with Homemade Croutons Recipe
Adapted from Moosewood Cookbook (2nd edition 1992)
by Mollie Katzen

Mmm-Mmm! This is one of my favorite winter soup recipes. It sounds plain but it's thick and the texture and flavor are awesome. I cook it at least once a month. If I cook it the same week as Spinach Rice Casserole then I can use the same block of Swiss Cheese for both recipes. The homemade croutons can be a little decadent when you are on a food stamps budget but I splurged this week and loved every bite! The only thing I omitted from the original recipe was the 2 tbsp of sherry because I don't consume alcohol of any kind-even with cooking. Serve this rich soup with a big green salad loaded with beans, nuts and winter's storage crops like beets, carrots, and parsnips.

In Health,
Miss Jolie Ann


Swiss Cheese & Onion Soup

Yields: 4 main dish servings


2 tbsp organic extra virgin olive oil

2 medium organic yellow onions-thinly sliced

2 medium cloves organic garlic-minced

1 tsp organic sea salt

2 tsp organic dry mustard

2 tbsp organic whole wheat flour

2 cups water

2 tsp organic prepared horseradish

2 cups organic unsweetened plain soymilk

1.5 cups organic Swiss Cheese-grated/shredded

black pepper


1. Add the olive oil to a large soup pot/dutch oven on medium heat. Add the onions and saute over medium heat for about 10-15 minutes until the onions are very soft and beginning to brown.


2. Add the garlic, salt, and dry mustard to onions. Continue to cook about 5 more minutes.


3. Gradually sprinkle in the flour, stirring constantly. Then add the water and horseradish. Stir thoroughly to incorporate everything. Cover the pot and bring to a boil. Once boiling reduce to a simmer on medium-low heat. Cook about 5 minutes more.


4. Add the swiss cheese and soymilk. Stir well and let continue cooking covered for another 10 mintues until the cheese is well melted.


5. Add black pepper to taste and serve with plain or with homemade croutons.


Homemade Crouton Recipe


Loaf of any type bread you fancy-I've used multi-grain baguette, ciabatta, and sourdough.

About 6 tbsp of organic butter or extra virgin olive oil


1. Preheat oven to 300 degrees F.

2. I wait for the bread to be several days old rather than fresh from the bakery. Slice it into small cubes.

3. Warm butter or olive oil in a large skillet over medium-low heat. Add the bread cubes and saute for about 10 minutes.

4. Place the sauteed bread cubes on an ungreased cookie sheet and bake for approximately 10 minutes. Check for browing color. Turn over bread cubes with a spatula and return to the oven to bake approximately 5 minutes more.

5. Serve toasty from the oven or they store well for several days in a sealed container in the refrigerator.


Spinach-Rice Casserole Recipe

Spinach Rice Casserole Recipe
Adapted from Moosewood Cookbook (2nd Edition 1992) by Mollie Katzen

I'm always looking for filling and delicious healthy casseroles. I found this one in the Moosewood Cookbook which I frequently cook from. I adjusted, added and deleted ingredients here and there with a delicious result. This casserole makes TONS of servings. I ate it for dinner 5 nights in a row and at one point started stuffing it inside buritos and still I didn't even eat half of it. So if you are cooking for a family it's a great size. If you are cooking for one, like I am, I'd chop this recipe in half!

In Health,
Miss Jolie Ann

Spinach Rice Casserole
Yield: 10 servings
2 cups organic short-grain brown rice--Uncooked
1 tbsp organic extra virgin olive oil
1 medium organic yellow onion-chopped
2 lbs. organic spinach-chopped
1 tsp organic sea salt
5 medium cloves organic garlic-minced
1/4 tsp organic nutmeg
1/4 tsp organic dry mustard
1/8 tsp organic cayenne pepper
black pepper, to taste
2 organic brown eggs-beaten
1 cup organic unsweetened plain soymilk
1 cup organic swiss cheese-grated/shredded
1. To cook the rice: place rice in a medium-sized saucepan with 4 cups water. Cover, bring to a boil, then lower heat to the lowest possible simmer. Cook covered and undisturbed for 50 minutes. Place cooked rice in a large mixing bowl.
2. Preheat oven to 350 degrees F. Oil a large casserole dish.
3. Heat the olive oil in a large skillet. Add onion and saute over medium-low heat for 10 minutes until soft and slightly browned. Add spinach, salt, garlic, nutmeg, mustard and cayenne pepper to the pan with onions. Cook about 5 more minutes until the spinach is wilted but still bright green. Combine onion & spinach mixture with cooked rice in the large mixing bowl.
4. Add eggs, soymilk and swiss cheese to the bowl and mix well until combined. Add black pepper to your liking.
5. Spread mixture into the greased casserole dish. Bake uncovered for 45 minutes until heated through and lightly browned on top.

Pea Planting!


Hooray for the sunny weather, even if it is still cold. We have a brief respite from the rain and I am loving getting some work done in my garden. It's President's Day Weekend and the old saying is "Peas in by President's Day." I feel super blessed by the sunshine visiting in abundance the very weekend I wanted to get planting. Thanks again Mother Nature for your cooperation.


Tanya turned the compost bins and we harvested the first compost since we began 9 months ago. It was gorgeous rich black-brown. I've been composting for several years and it still amazes me every time I see the finished product. I spread lots of this fresh compost in my raised beds, particularly the bed that was plagued with pests and disease which completely destroyed my Autumn brassica crops.


I prepared two of my raised beds with a generous helping of Whitney Farm's Life Link Tomato & Vegetable Food. While preparing my beds for planting seeds I was careful not to disturb my overwintering red onions, yellow onions and garlic. Quite by surprise I discovered some overwintering carrots whose leafy tops were gone. I pulled 4 beautiful big carrots and ate them raw in a salad that same night. They were so sweet and quite an unexpected surprise!


This year I planted 2 varieties of Peas from Territorial Seed Company: Cascadia (snap) and Oregon Giant (snow). Check out Territorial Seed Company at: http://www.territorialseed.com/ This is the 2nd year I'm planting Cascadia, and Oregon Giant is something new for me. I coated my pea seeds well with an inoculant. Inoculant is supposed to enhance the nitrogen-fixing bacterial nodes on the plant roots (all in-line with the soil food workshop I recently attended!) I gave both pea plantings support by constructing bamboo & tree branch structures to climb. Along with my peas I planted radish seeds: Cherry Belle and Easter Egg.


Since planting 5 days ago we've had ample sunshine and a little bit of rain here and there. I'll expect to see radish seedlings poking up in another week, and peas the week after that. But for now I am ecstatic to gaze upon my minimal garden soaked in sunshine practically every day.

In Health,
Miss Jolie Ann

Thursday, February 14, 2008

The Late Winter Garden

Dear Gardening Friends,

In Portland we are about 2 months into winter with one more month to go! This is the time that we gardeners pour through our seed catalogs dreaming of warmer weather, bright sun, and long days in the garden. It is the time of year many of us get a head start on summer gardening my starting our seeds inside.

Last weekend I went to a Growing Small Fruit Class at Portland Nursery to improve my skills with strawberries, blueberries, blackberries, raspberries and grapes. This weekend I'll attend the annual Portland Yard Garden & Patio Show at the Oregon Convention Convention Center.

This is the season of planning and dreaming. I myself am daydreaming of the 5 new tomato varieties I am trying this year and the tiny pickling cucumbers I'll grow for canning homemade sweet pickle relish. I am excited for the vegetables I will grow: yellow wax beans, snow peas, carrots, zucchini, patty pan squash, pumpkins, lettuce & salad greens, spinach, swiss chard. I can almost smell the basils waiting to be made into homemade pesto. The bursts of color and joy that come from 6 varieties of sunflowers of all sizes and colors. Delicious strawberries picked and popped directly into your mouth.

In 2008 our Portland weather has fluctuated a lot from low 20s to low 50s, with lots of rain, high winds, sleet, hard frosts, and even a little sprinkling of snow. The weather is unpredictable and after several days well below freezing, once the sun came out and my bird bath water melted from it's ice cube state I am eager to get gardening. However, our average last frost date is April 15, so you cannot get too eager or you risk a late frost ruining all your tender young vegetable plants.

Last year in late March we moved into our rental house in SE Portland. I left behind my established vegetable, herb and flower garden at the duplex I'd lived in for over 3 years. Once settled in our new house a few weeks we quickly set out to remove grass and lay the foundation for 5 raised wooden beds, 2 compost bins, and 3 flower and herb borders. We removed a lot of grass and then I hauled in several truckloads of rich compost (from Mt. Scott Fuel Company conventiently located in my SE neighborhood). By the beginning of May I was already ready to plant my Summer garden. At the duplex during the winter I'd started 100s of plants from seeds to be transplanted into my Summer garden. Unfortunately the majority of them did not survive the trauma of moving into a new home and months of time & energy, not to all the money I spent on seeds was wasted. No worries I just started fresh by planting seeds directly in the ground at the new house. So this Spring I am all ready to go!

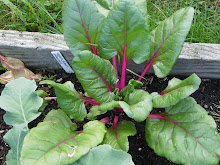
My late Winter garden still has some survivors and a little activity. Italian & Curly Parsley, French Sorrel and Cilantro have all survived with the hard frosts and snow with no protective measures on my part. Awesome. A lot of herbs hung in there until the week we had no moisture and temperatures steady in the 20s. That cold snap took the last of my lavender, sage, oregano, nasturtium, violets and alyssum. No worries because now I just cut the herb plants back and they return hardier than ever in the Spring. The flowers re-seed themselves and will be abundant by Summer. I also have overwintering carrots, red onions, yellow onions and garlic which should all be ready for harvest by late Spring/early Summer.

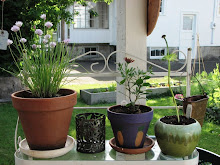
My raised beds with the overwintering vegetables and hardy herbs look pretty sparse this time of year. I clean them out during the fall and again in early winter to minimize hiding pests and disease. It also makes it easier to plant seeds immediately in the beginning Spring. Next weekend and then the first in March I'll begin planting my hardy Spring vegetables, flowers and herbs such as peas, radishes, violets, pansies--but more on that in another post. Heavy feeding vegetables last Summer and a very wet Winter have zapped my raised vegetable beds of essential nutrients. To prepare my raised beds I will be doing a simple soil test and then adding some Whitney Farms Life Link Tomato & Vegetable Food and Life Link All-Purpose Plant Food, depending on the need. I have success with both of these all natural products. You can buy Whitney Farms products all over Portland at Portland Nursery, Fred Meyer, and Wal-Mart. You can find great organic gardening information, particularly around soil amendments, at their website: http://www.whitneyfarms.com/

Late last Summer my Autumn greens: arugula, lettuce, spinach, were all devoured by slugs or snails-damn them! So this week I'm preventing slug and snail problems with a good dose of Sluggo, which is an all natural, organic gardening approved product containing iron phosphate. It holds up through the rainy springs of Portland and is safe to use around pets and wildlife. Sounds good to me!

Additionally I have 4 flower and herb borders on the east, south, west and north edges of my house. All year round I let the west side border go wild with whatever wants to grow there. There are bearded irises, snapdragons, daffodils, calendula, grass and an abundance of weeds. I let it grow wild as one dedicated space that remains undisturbed to shelter beneficial insects and whatever else decides to live there. My south side border is located in my backyard next to the raised vegetable beds. It is a blending of 3 existing rose bushes (At least 25 years old) and daffodils, plus the annuals and perennials I added last year-parsley, sage, marjoram, calendula, marigolds, dahlias, alyssum, nasturtium, pansies, violets, petunias. By Autumn the alyssum and nasturtium had "won" completely covering the bed and spilling out into the lawn. Both these plants seemed cold-hardy and unaffected as weather dropped into the upper 30s. So for the Winter I did not pluck out dead plants, prune, or clean up. Intentionally, I let everything die and wither where it was. I do this because as an Organic Gardener I am seeking collaboration with beneficial insects. Beneficial insects take care of pesty insects, pollinate my plants, and improve the quality of my soil. I am aiming for a biologically diverse garden with lots of plant variety. I attempt to garden more in tune with nature. For these reasons I resist the urge to clean up all areas of my garden in the Autumn. My messy more natural spaces provide food for wildlife-such as rose hips for birds, seeds for birds and squirrels. And, they serve a very important purpose of sheltering my beneficial insects during the cold wet Winters. I do not disturb the rambling overgrown alyssum plants because they are Winter hideaway of my garden friends. With balance in mind I did let myself clean up and prune the borders on the north and east side of my house because they are at the front and driveway and I look at them every day. I think the bugs are ok with that knowing they have 2 other big spaces to live undisturbed.

That's it for the Late Winter Garden here in SE Portland. I am eager to get started planting in the next few weeks and will post again soon about the early favorite: PEAS!

In health, Miss Jolie Ann

Banana Nut Muffins

Happy Valentine's Day! This morning my 2 1/2 year old friend, Jasper, and I enjoyed baking these muffins together. Baking is a great activity to share with young children-it teaches them math, how to follow directions, & develops their fine motor skils and eye-hand coordination. (Yes, in my other life I am a Child Development Specialist!) We had a great time together and the baking muffins made the house smell yummy delicious.

I try to bake a batch of muffins every week to enjoy as a snack. I bake this recipe when I have a few bananas turning brown and really ripe. Today I was using all ingredients that I already had on hand, so the entire muffin recipe cost me nothing out of this week's food budget. You can't beat that! I like to make large muffins, so this recipe yields 6 large muffins or 10-12 smaller muffins. 6 muffins is a perfect amount for me. I can eat one a day for the week before they start going hard and stale. ( I store my muffins in a sealed container in the fridge) If you are preparing banana nut muffins for a family or a brunch just double the recipe to make a dozen.

In health,
Miss Jolie Ann

Banana Nut Muffins
This recipe makes 6 large muffins or 10-12 small muffins

2 very ripe organic bananas
1/3 cup organic canola oil or organic melted butter
¼ cup organic honey
2 organic brown eggs, beaten
1 teaspoon alcohol-free pure vanilla
1 teaspoon baking soda
¼ teaspoon sea salt
2 cups organic whole wheat flour
1 cup organic walnuts, chopped
organic canola oil spray

Preheat oven to 350 degrees F.

1. Peel and mash bananas in a large mixing bowl.

2. Mix in the canola oil or melted butter, beaten eggs, honey and vanilla.

3. In another bowl combine the baking soda, sea salt and flour and mix well.

4. Pour the banana mixture into the flour mixture and stir until it is just incorporated.

5. Fold in the chopped walnuts.

6. Spray the muffin pan with canola oil until very lightly greased.

7. Pour mixture into prepared muffin pan. Bake for 25-30 minutes. You'll know they are done with they are lightly browned, big and fluffy, and when you insert a toothpick into the center of one it comes out clean. Let cool (or not) and then devour!